
It’s 2020. If you are a Lightroom user, now is a great time to take some steps to reevaluate and optimize your Lightroom catalog. Here are my 2020 LR performance tips:
01 When buying a new machine, get at least 32GB RAM. 32GB is the new minimum.
02 When buying a new machine, buy a big, fast Solid State Drive (SSD). Having 30-40% of that drive open ensures both its performance and longevity. Don’t run an SSD close to capacity.
03 SSDs have the single biggest impact on performance. Have your OS and Lightroom running on an SSD .
04 Keep your working files on an SSD. Archive older, dormant work to slower HDDs.
05 Work from smaller previews. LR default settings create inefficient bloated previews. In Catalog Settings, under File Handling, I recommend using the 1440 preview size, Low Preview Quality, and Discard 1:1 Previews after one week. These lower preview quality settings might sound scary but I’ll suggest you won’t be able to see a difference, even on 5k displays. Try it! Remember these previews only effect what we see in the Library module, not the Develop module, and it doesn’t effect the quality of prints and files sent to clients. Reducing the file size of your previews addresses latency issue switching between the Library and Develop modules, and between images within the Library module. Previews will be generated more quickly upon import and images will load faster when viewing images for the first time after import. Put simply, smaller previews makes LR more snappy.
06 When importing images, choose the Copy as DNG option. DNG files really are smaller, faster and safer. LR’s new threaded import process means it doesn’t delay image readiness like it used to. It imports with the same speed as Copy and only converts to DNG afterwards, allowing you to work while it does this. Converting to DNG is worthwhile for a bunch of reasons we can discuss later…
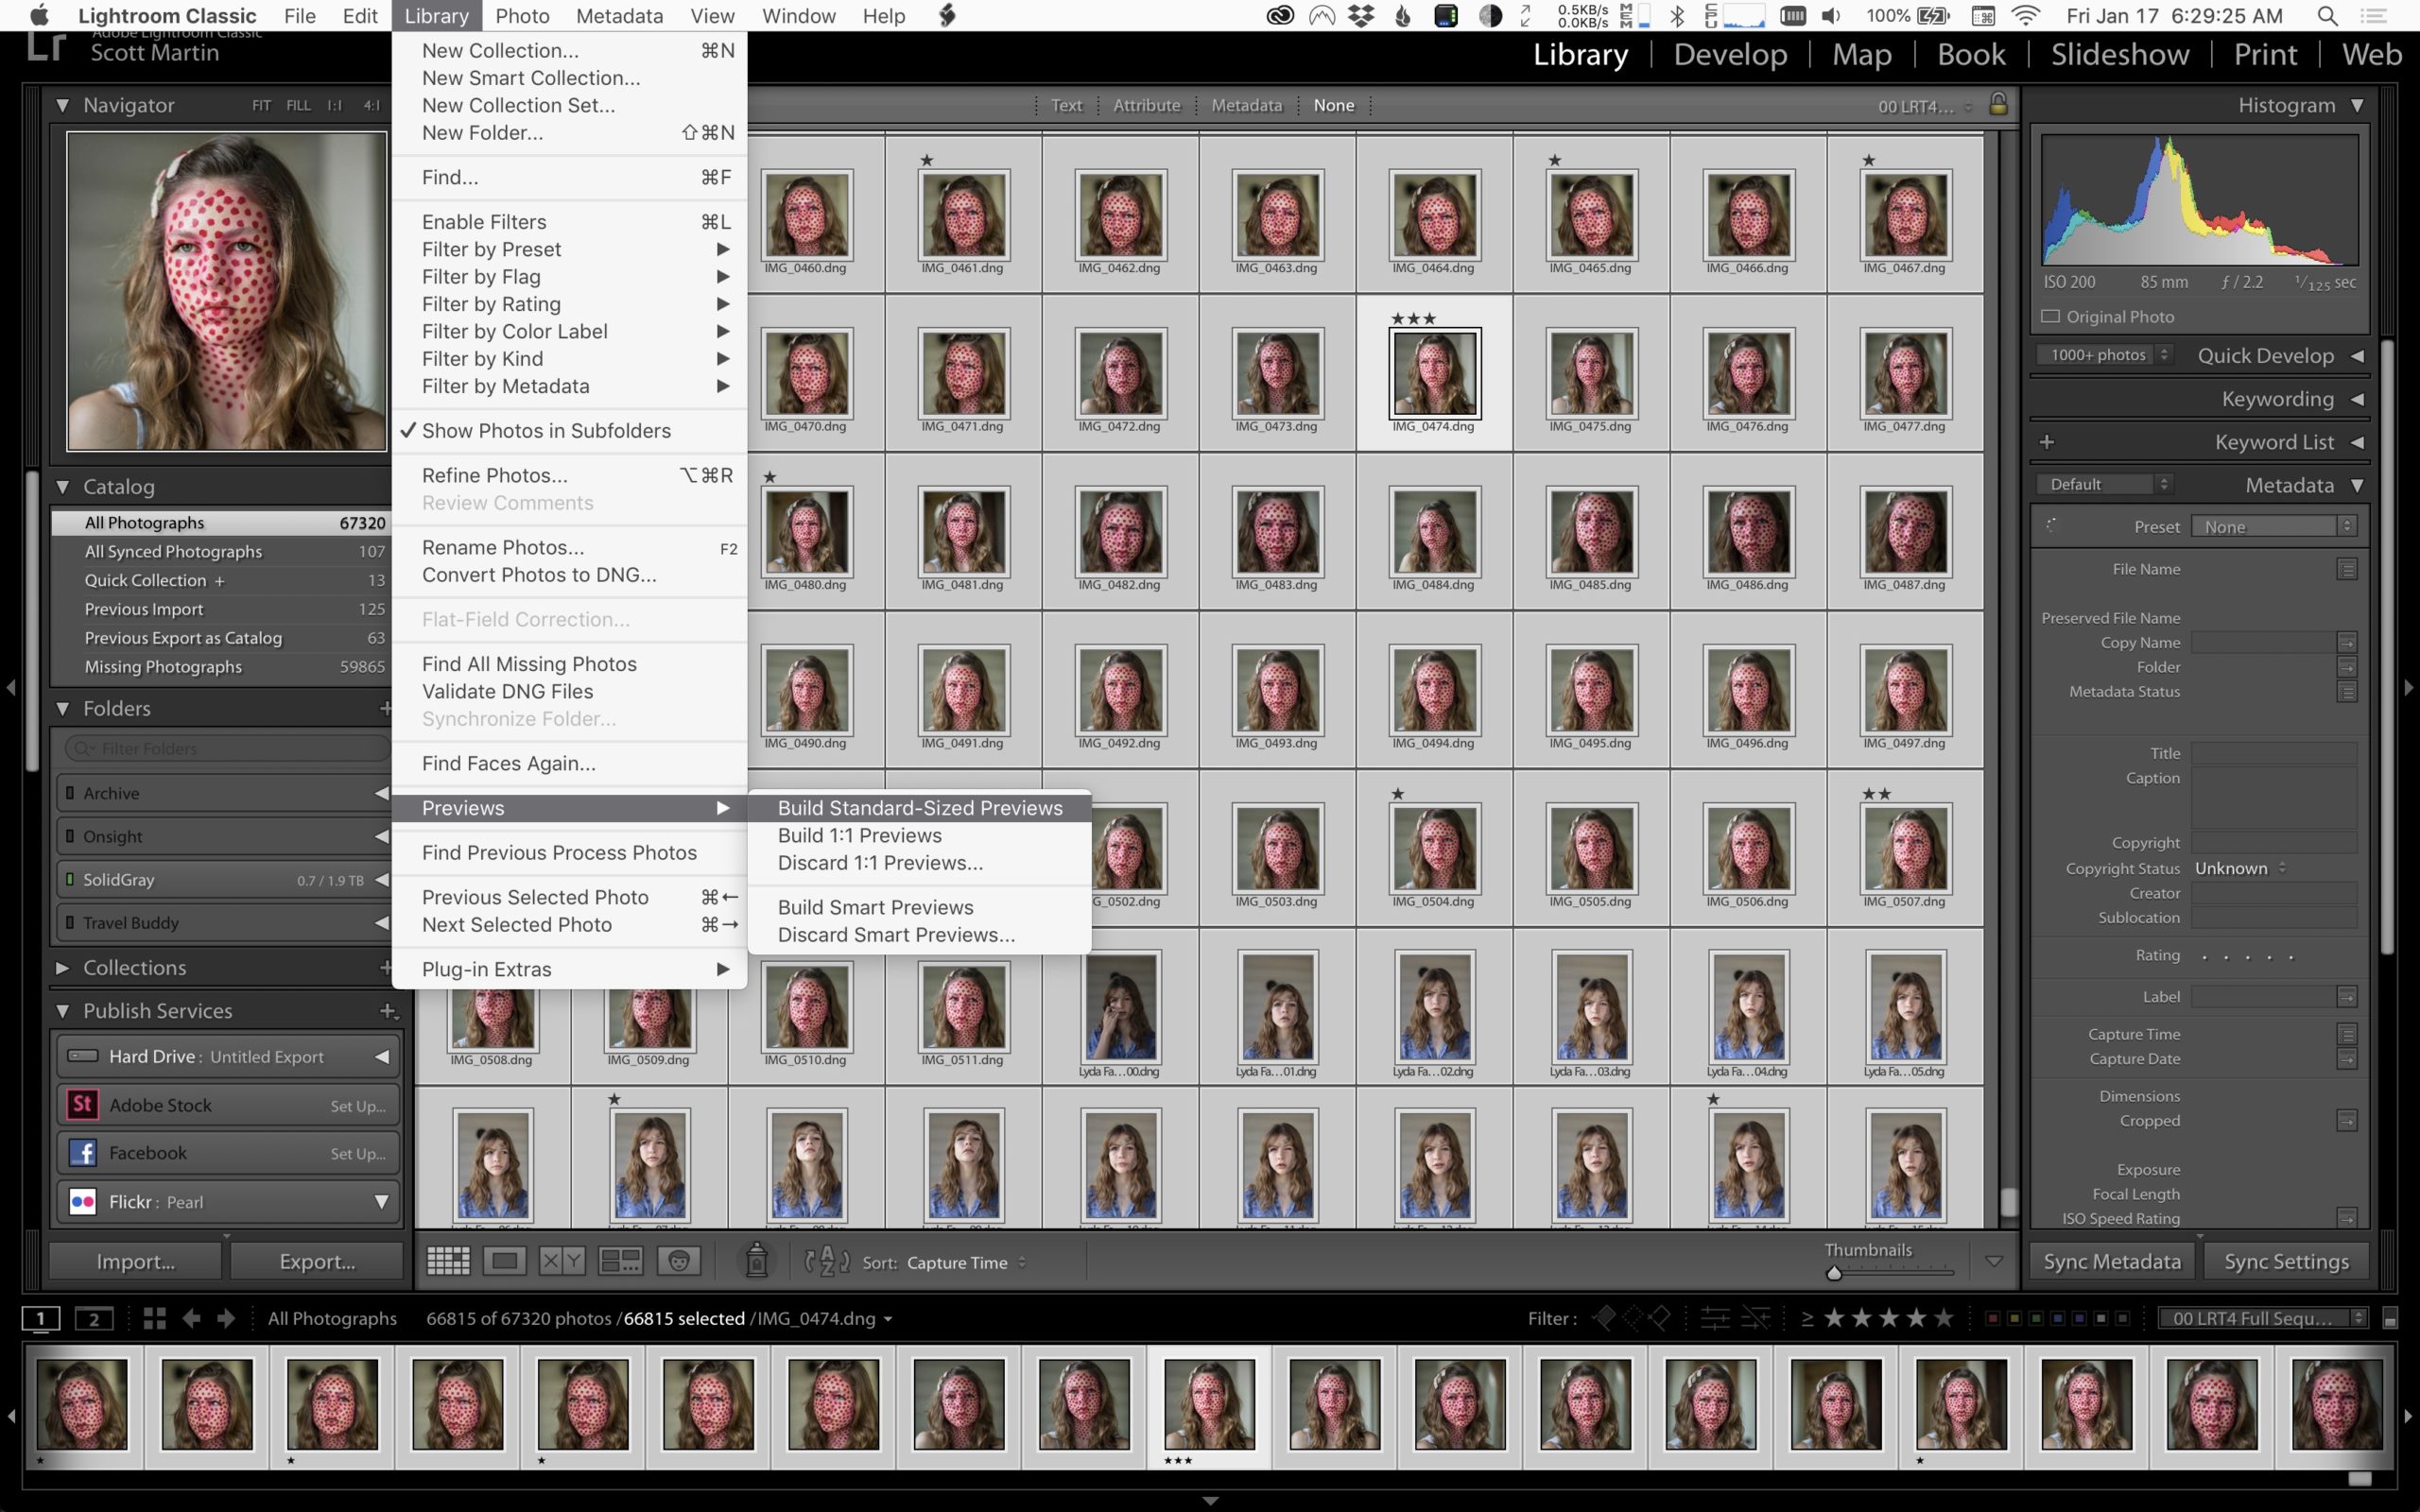
07 When importing images, I suggest the Standard previews option. Once the standard previews are built after importing, your image review and rating process will be much faster than had you selected the “Minimal” previews option for example.
08 When importing images I suggest unchecking Build Smart Previews (unless you really know what they are and are using them as intended). Smart previews can allow you to work on an image while you’re away from the RAW file, and on mobile devices. They can also speed up the Develop module quite a bit because they are a low res proxy. The pros I tend to work with need the full resolution file to zoom into to 1:1 and Smart previews do little more than take up space on the drive and slow things down, thus my recommendation to skip them. But as always, do what’s best for your needs.
09 In the LR Catalog settings, under Metadata, check the Automatically write changes into XMP checkbox. This tucks the metadata directly into DNG files and ensures they don’t get lost over time. This technically degrades performance but I find it to be imperceptible on modern hardware and the benefits are worth it.
10 Let LR backup and optimize monthly on exit.
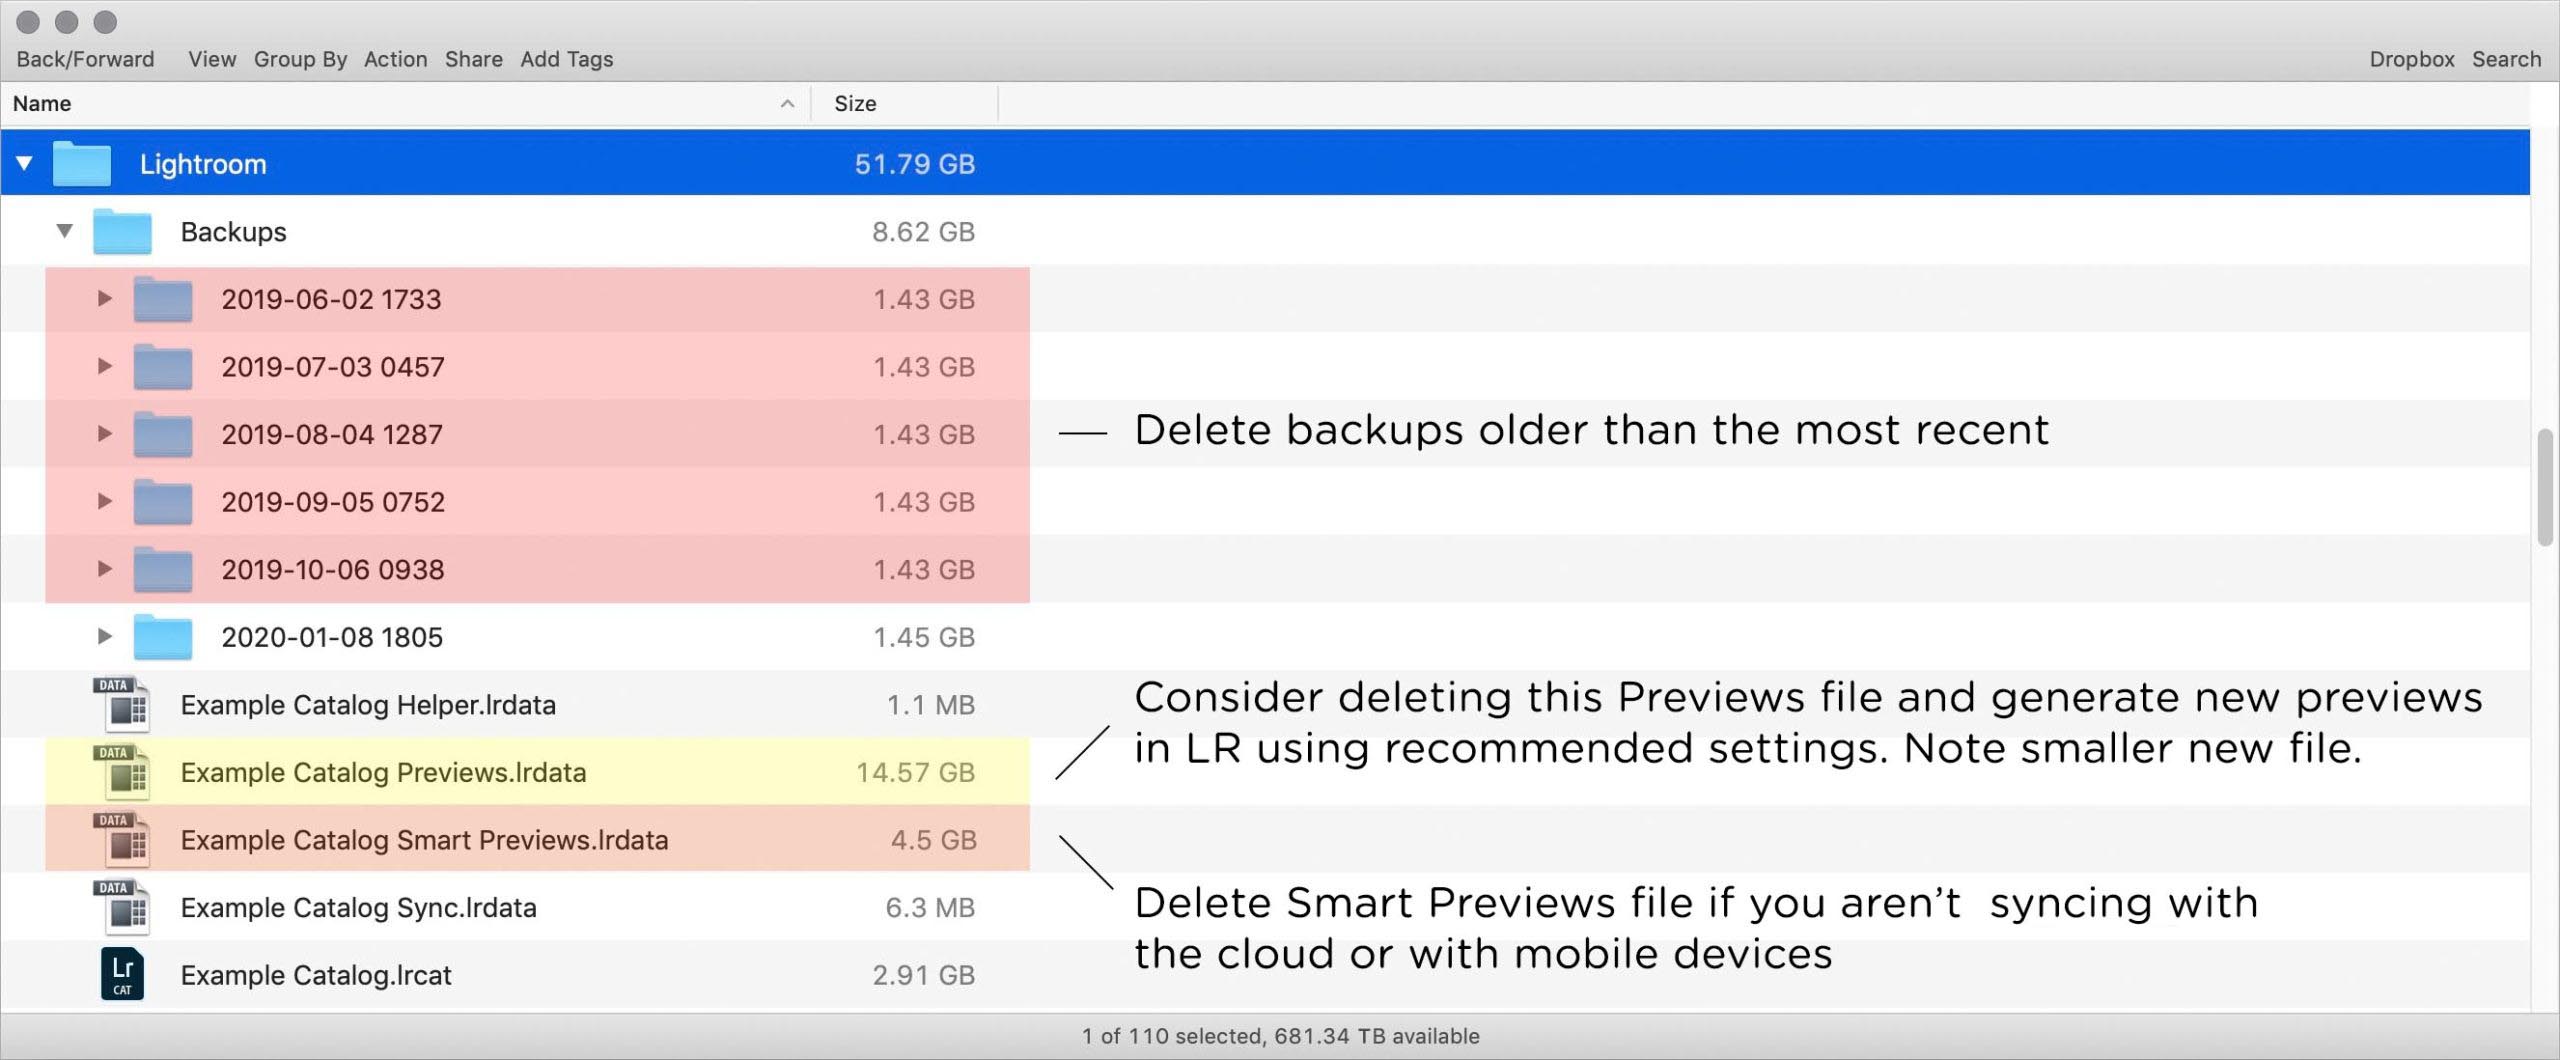
Keep an eye on the LR catalog folder. With LR closed:
11 Delete older backups that can get out of control and take up space.
12 Delete the Smart Previews file if you don’t know what smart previews are.
13 Consider deleting the Previews file and rebuild all previews with the smaller settings. A smaller previews file is important to performance.
14 With LR closed, you can manually rename all of the corresponding files and they will link together. For example the “Lightroom Catalog 2.3.3” portion of the file names can all be changed to “MartinPhoto Catalog” for example.
Again, keep an eye on this catalog folder over time! Keep it tidy, organized and as small as possible.
15 Consider archiving older images with fewer stars with the DNG lossy compression option. This can have massive implications on the overall file size of archives. I’ve seen 75TB archives reduced to 20TB just by compressing less critical, 0 star images.
16 Organize and consolidate your archive. Todays affordable and huge 16TB single HDDs are compelling.
17 Make sure each drive has a local backup. Use the cloud only for secondary backups.
Final thoughts
Busy professional photographers working under deadline need every bit of speed they can get. Pros feel the latency issue when switching between the Library and Develop modules, and between images within each module. Pros know how things grind down when you have 50+ spot removal points or adjustment brush strokes on any given image. And for those of us with 50+ megapixel cameras we know all too well how performance degrades exponentially with larger files. Even with the latest fastest, performance oriented $20,000+ computers, Lightroom becomes unacceptably slow on high res images requiring lots of retouching. The latency and delays can be maddening and competitors products often outperform Lightroom.
We’re at a point in time where a lot of pros have been using LR for over a decade and their archives and catalogs are massive, and the process of optimizing, organizing and consolidating them can seem daunting. At the same time, sensor resolutions are only increasing along with our performance demands. I’d love to see “Lightroom Classic” renamed to “Lightroom Pro”, focusing on performance issues for high resolution files, extensive retouching, and tools for managing large image libraries. I think there iss a whole community that’s ready for that.
Echo yoiur comments on need for a lightroom Pro… one that is designed for simplicity and cultural heritage….. and DAM too…. I have some 170k photos of artworks…
Agreed! I wish Adobe would provide a precise 1:1 cropping tool, more CH features to compete with CaptureOne (like FADGI reports), and address the recent performance degradation.Less silly consumer oriented tech and more professional tech!
Thanks for a current assessment on LR performance and the ways to mitigate short comings.
You are welcome!