
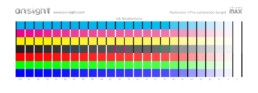
ChromaMax Part 1: Printer Ink Restrictions
The first step to calibrating a printer in a RIP is to set the per channel ink restrictions. The challenge here is that RIPs typically have very poor (or no) tools for determining the optimal settings. The first screen grab below shows a popular RIP that encourages you to set the ink sliders without any guidance whatsoever. Color consultants are pretty good at making educated guesses, or at least have a crude process for getting close. The second screen grab below shows another popular RIP’s Ink Restrictions process where it determines the values automatically, but these settings are…
New Website!
Hey everyone! We just launched a new website that better focuses on communicating our strengths. The recommendations page has a bunch of product recommendations that we often suggest for our clients. And the downloads page has a bunch of updated targets and evaluation images we think printmaking geeks will get a kick out of. We’ve also created a ton of new targets, and evaluation images that allow us to calibrate and evaluate equipment more precisely. New business cards, stationary and client gifts also along with this new look. And we’ve formalized and branded our calibration…

Canon iPF Pro-4000 Review
Canon has taken a great leap forward creating a whole new generation of their aqueous printers that have some exceptional features. Now that the Canon Pro-4000 has just started shipping, I thought I would highlight a few features that I found significant. Roll Feed Unit and Paper Handling The optional roll feed unit can be used as a take up real as we have seen in printers before. But this roll feed unit can also act as a second roll feeder with its own unique paper path to the printing area. With this unit we essentially have double roll support that allows users to keep two different rolls…

A quick introduction to Lightroom 6/CC
When you first install Lightroom 6/CC you may find yourself asking “Wait, how is this different from Lightroom 5?â€, which is to say it’s an easy upgrade and familiar on all counts. But as you use it you’ll notice lots of meaningful new features everywhere - some small and some big. Here are five things in LR6/CC that I find significant: Photo Merge The “Merge to Panorama in Photoshop†and “Merge to HDR in Photoshop†features have both been brought natively to Lightroom. And let me tell you, the process of combining frames in LR6 is so fast, easy and friendly that it’ll make…
What my days look like as a consultant
I thought I’d show everyone what my days often look like as a consultant. For 20 years, I’ve traveled around working with people in their studios on issues like color management, workflow, and print quality. A lot of the time this means working on big printers like these.
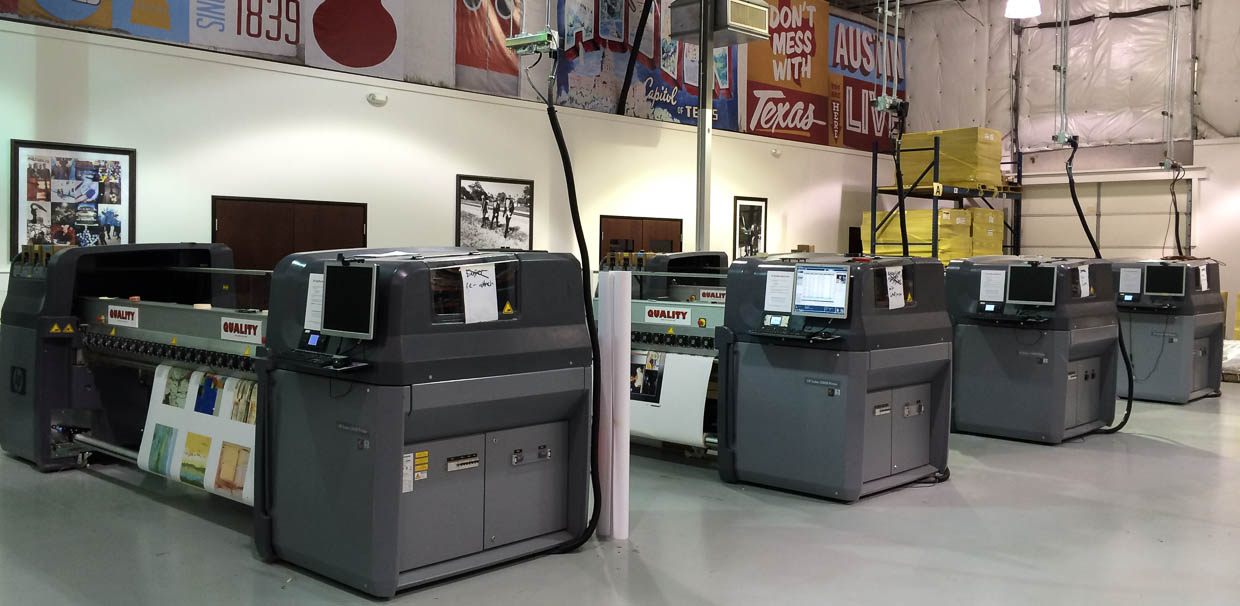 HP Latex printers at New Era Portfolio
In addition to common aqueous inkjet printers, I spend a lot of my…
HP Latex printers at New Era Portfolio
In addition to common aqueous inkjet printers, I spend a lot of my…
Commentary: Monitors are bad and noise (can be) good
We'd like to think that todays $1000+ LED LCD displays are great but I'm going to say they're not. They suck actually. We just don't know better because we haven't seen anything better - yet. Today's displays are like cars from the 1970s - much better transportation than a decade prior but still horribly polluting, underpowered and unsafe in comparison to what's coming in the next few decades. Today's desktop computer monitors are fairly low resolution ranging from 72-150ppi. While this works fine for 95% of the people out there communicating via email and browsing the web, its having some…
Tips for upgrading to Lightroom 4
![]() Every time we upgrade Lightroom we have a great chance to get a fresh start, shed bad habits, and tweak our workflow. Customizing one's process in Lightroom and reducing dependency upon Photoshop is the key to having a smart, efficient workflow that minimizes our time at the computer and maximizes time spent making images. I've been spending the last few months visiting with pros in their studios, auditing their workflows and getting them started on the right…
Every time we upgrade Lightroom we have a great chance to get a fresh start, shed bad habits, and tweak our workflow. Customizing one's process in Lightroom and reducing dependency upon Photoshop is the key to having a smart, efficient workflow that minimizes our time at the computer and maximizes time spent making images. I've been spending the last few months visiting with pros in their studios, auditing their workflows and getting them started on the right…
i1Pro 2 "Raven" Review
 I have been testing the new i1Pro 2 (codenamed "Raven") since May of last year. Xrite's spectrophotometers have evolved considerably since the original i1Pro, so with this next generation device they've completely redesigned it from the inside out, and all of the accessories that go with it. It's a versatile, handheld device that has a lot of advantages over it's predecessor. With dual light-sources, the i1Pro2 is capable of taking…
Using i1Profiler for QTR grayscale measurement and profiling
![]() Recently I wrote an article on "Using ColorPort for QTR grayscale measurement and profiling." Today I'd like to talk about using i1Profiler v1.3 for QTR grayscale measurement and profiling. I've been using i1Profiler's new "Measure Reference Chart" feature and the new i1Pro2 "Raven" device for a year and now that it's officially released I can tell you about it.
i1Profiler is XRite's new professional level application that anyone can…
Recently I wrote an article on "Using ColorPort for QTR grayscale measurement and profiling." Today I'd like to talk about using i1Profiler v1.3 for QTR grayscale measurement and profiling. I've been using i1Profiler's new "Measure Reference Chart" feature and the new i1Pro2 "Raven" device for a year and now that it's officially released I can tell you about it.
i1Profiler is XRite's new professional level application that anyone can…
Celebrating 20 Years of Color Management Consulting
20+ years ago I was splitting my time between a job where I was a Leaf45 scanner operator and an apprenticeship with a master printmaker. In the printmaking studio we were making large digital negatives on an imagesetter and using them to make hand-coated platinum/palladium prints in a wet darkroom. Back then everyone was using Photoshop 2 and had CRT monitors. While the color scans coming off the Leaf45 seemed pretty decent after a little color correction in curves, I was frustrated with how different the handmade B&W platinum palladium prints looked in comparison to the same images…